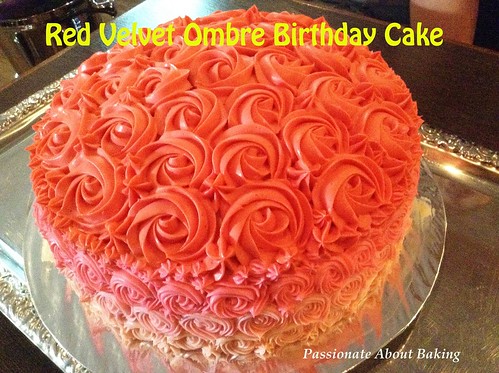
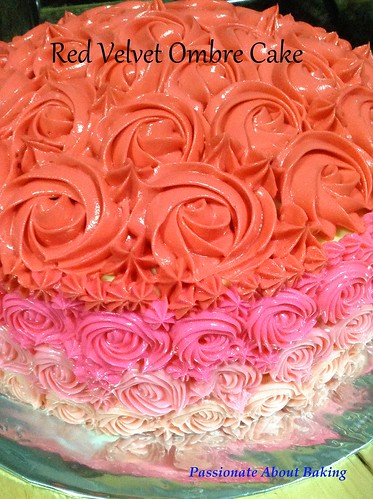
Finally, two days before her birthday party, I decided to bake her a (surprise) Red Velvet Cake. I know she loves my Red Velvet Cake and Chocolate Cupcakes. Instead of just frosting it normally, I decided to make an ombre rose frosting for her.
"Ombre refers to colors that blend into each other, often from dark to light." - Kind Arthur Flour. I'm very often awe by beautiful colours of ombre cakes and rainbow cakes. I've finally pick up the courage to try this ombre frosting. The Red Velvet Cake turned out to be really good. Her guests were very impressed with the beautiful frosting, and the great tasting cake I made. My sister was also very pleased and delighted. I was so happy to have made the right
Recipe for Red Velvet Ombre Cake, recreated from Joy of Baking and previous post.
Makes a 4-layered 9" round cake
Red Velvet Cake
Ingredients:
500g Cake flour, sifted
1 tsp Fine salt
30g Dutch-processed cocoa powder
227g Liv unsalted butter, at room temperature
280g Caster sugar
4 large Eggs
2 tsps Vanilla extract
480g Buttermilk (480g whole milk + 2 tsps fresh lemon juice)
2 tsp Liquid red food coloring
2 tsp White distilled vinegar
2 tsp Baking soda
Method:
Cream Cheese Frosting (adapted from Martha Stewart)
750g Cream Cheese
500g Liv unsalted Butter, softened
210g Icing sugar, sifted
3 tsp Vanilla extract
Method:
- With an electric mixer on medium-high speed, beat butter and cream cheese until fluffy, 2 to 3 minutes.
- Reduce speed to low. Add sugar, in three batches, then add vanilla, and mix until smooth and combined, scraping down sides of bowl as needed. If not using immediately, frosting can be refrigerated up to 3 days in an airtight container. Before using, bring to room temperature and beat on low speed until smooth again.
To assemble:
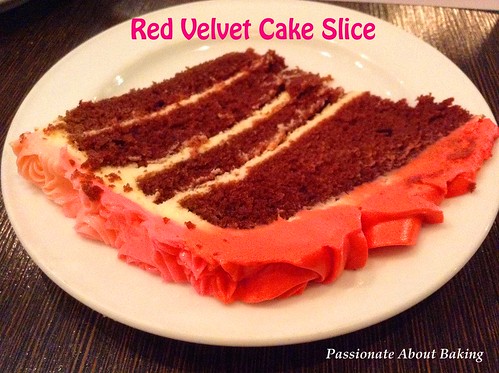
- Slice both the cakes into 2 layers, making a total of 4 layers.
- Place one layer on the cake board, spread with cream cheese frosting.
- Repeat for 2nd, 3rd and 4th layer.
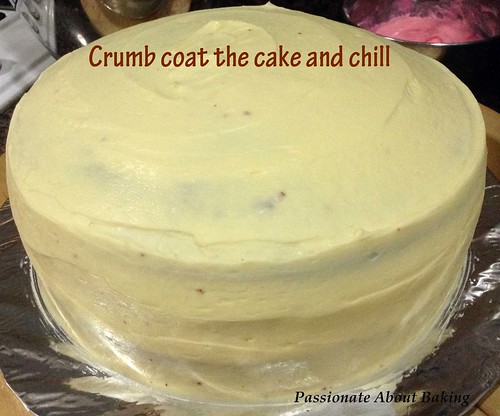
- Then crumb coat the whole cake, ie. frost the cake all over with cream cheese frosting.
- Refrigerate it for at least 30mins.
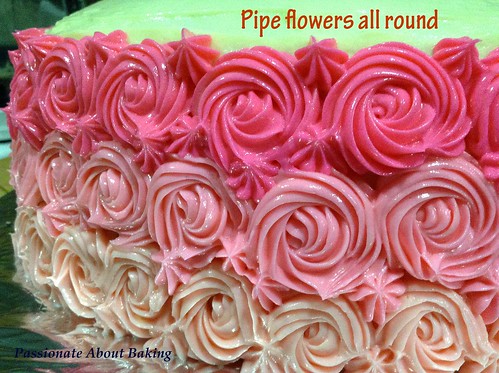
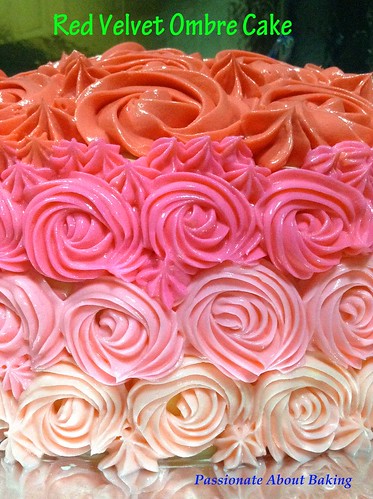
- Meanwhile, take about 100g (or 120g) of the cream cheese, mix with your desired colour. In my case, it's pink. I used a toothpick, insert into my Wilton gel colour lightly, then stir it into my bowl of cream cheese.
- Using a nozzle tip #21, pipe a flower at the side of the cake, starting at the bottom. Filling up gaps as you piped.
- When completed 1st layer, with the remaining cream cheese, add in slightly more colour, adding more cream cheese as desired.
- Continue piping the second layer.
- Repeat #8 & #9 for the 3rd layer flowers.
- Then using the remaining colour of the cream cheese, add in more cream cheese, and add in red colour. Mix well.
- Using nozzle #1M. Pipe roses all round the top. Filling up gaps as you go.
- Chill it before serving.
I'm submitting this post to Aspiring Bakers #40: Rainbow and Ombre Party! (March 2014) hosted by Cynthia of The Baking Biatch.


4 comments:
Hi Jane, the ombre roses looks really pretty. I still couldn't make such a nice ombre cake. The first I made wasn't nice and I didn't use different red colours for the icing. In this case, can it still named as ombre? I like to submit to the aspiring bakers too if it is ok that the rossett on the cake just in one color only.
Hi Grace,
Thanks. You should try using different colours, they look really great on the cakes, though my colours are not so even. Based on the criteria for AB, it needs to have at least 4 colours to be considered ombre. Unless you made rainbow cake, which qualifies.
Ohh I see I see. Understand now. Thank you!!
Thankss for sharing
Post a Comment
Be free with your mind!